 May 19, 2009
 Tighten the low end of your mix with a frequency analyzer
This is the second in my series of “mix tips” articles. You can read the first here.
Most mix engineers don’t hear the bottom octave (20-40 Hz) because their monitors can’t produce it. Unless your room is 300 square feet or larger, and professionally tuned, adding a subwoofer will probably do more harm than good. Whether or not you can hear it, it’s important to balance the sub bass with the rest of the mix. You want deep full tone from the bass and a healthy “chest thump” from the kick without blowing out any speakers.
A common DIY solution is to simply roll off the whole mix with a highpass filter (HPF, also known as a low cut or LC), but that’s ugly and imprecise. Even if the frequency and slope of the filter leave an appropriate amount of sub, the EQ will color the mix, usually in an undesirable way. Instead, we want to sculpt the low end on a track-by-track basis, balancing out the sub bass and shaping competing elements to produce a clear and powerful foundation for your mix.
We can’t always hear what’s down there, but with the right tools, we can see it.

TIP 2: Use a frequency analysis plug-in to cut unnecessary bass
My personal favorite is Voxengo SPAN, which you can download for free. It’s a VST plug-in for Windows only. Perhaps someone could recommend a Mac alternative? I know Waves has their PAZ Analyzer, but I’m not sure it’s up to the task. Configure the plug-in as follows:
- Set the block size to 8192. The higher the block size, the better the accuracy at the lowest frequencies, but the slower the refresh rate. If you want to see the transient attack of a hi-hat, a small block size is better, but for our purposes, 8192 is perfect if your CPU can handle it.
- Set the Low Freq to 5 Hz in order to detect DC offset and other subsonic garbage.
- Set the dB Scale to -20. This setting adjusts the frequency display on the y axis. -20 is probably right for an unmastered mix, but let your eyes be the judge.
- Click on Preset, then Set as default so you won’t have to go through steps 1-3 again the next time you launch the plug-in.
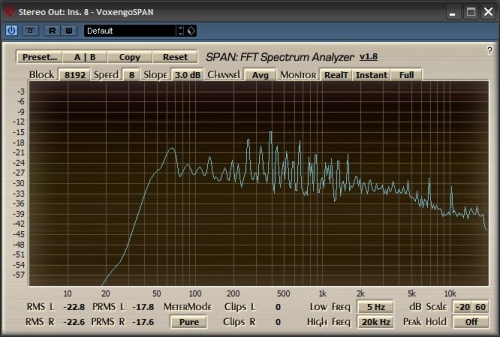
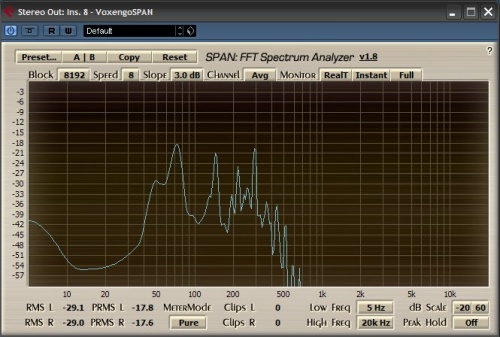
The screenshot above was taken during playback of my song “We’re Not Getting Any Younger.” It’s a good example of how a healthy mix should look (if I do say so myself). There’s no extra garbage below 20 Hz, and the lows carry most of the energy, with a gently falling slope all the way to 20 KHz. It didn’t start that way though! Check out the synth bass before EQ:
See all the extra energy below 20 Hz? Without getting into a technical discussion of DC offset (which nobody I know, myself included, seems to fully understand), we don’t want that. I call it “the snake” because of the way it undulates during playback. We want to cut off the head of the snake (the subsonic peak) with a HPF. Without further ado, here is my four-step method for sculpting the low end of a mix:
- Insert SPAN on the master bus. Place it somewhere on the screen where it won’t get covered up, or set it to “always on top.”
- Solo the bass. If you see more than a hint of energy below 20 Hz, insert a HPF into the first slot (or use your software’s built-in EQ if you don’t have anything better). Set the frequency and slope to tame the frequencies below 20 Hz while altering the tone as little as possible. Lower and sharper is better, assuming it gets the job done. If you set the frequency too high, the low notes will be quieter than the high notes. Experiment with a variety of EQs to see which one colors the sound in the most desirable way. My personal favorite is the Neve 1081 on my UAD-2 Quad, though I’ll sometimes use the Waves LinEQ for transparency.
- Solo the kick. Repeat the process. If the bass and kick are fighting each other, you might choose to accentuate the sub bass in one and the mid bass in the other. For example, you might roll off the kick at 80 Hz and boost the “snap” in the 1-2 KHz region, while letting the bass dominate the sub. Taking it a step further, you might try complimentary EQ by cutting the bass at 100 Hz by a couple dB, and boosting the kick at the same frequency by the same amount at the same bandwidth.
- Solo the other tracks one at a time. If there’s not much going on below 150 Hz, leave it. If there is, insert a HPF into the first slot. We want the bass and kick to utterly dominate the lowest frequencies. Use your ears to set the frequency and slope of the cutoff while the track you’re adjusting plays with the bass and kick. It’s okay if it sounds thin by itself, as long as it plays nice with the bass and kick. I usually roll off my vocals around 150 Hz, but sometimes I’ll roll off pads or guitars as high as 300 Hz. For meaty snares, I might go as low as 80 Hz. You don’t want to clutter the bass, but you don’t want to leave a hole either.
On synthesizer tracks, you might be able to address the issue at the patch level. The Access Virus is the worst offender, but it’s easy to balance the sub bass by turning down the suboscillator (Osc3). On the other end of the spectrum, Native Instruments FM7 and FM8 have a habit of producing nasty spikes in the 17-18 KHz region, which can be tamed with a LPF.
The result is a mix with tight, clean, punchy bass. Best of all, if you clear the subsonic clutter from just the offending elements of your mix, your mastering engineer won’t need to roll off the whole thing. I’ve got a $1,500 EQ (the Algorithmix PEQ Red) that I bought just for its low cut filter. It does a remarkable job, but it’s still a compromise.
Below are unmastered clips of three songs from my new album, with and without low cuts on individual tracks. While you may initially prefer the “no low cut” versions simply because they have more bass, listen for the clarity of the individual elements in each mix.
We’re Not Getting Any Younger (no low cut)
We’re Not Getting Any Younger (low cut)
If Not Now When (no low cut)
If Not Now When (low cut)
Behind the Rhine (no low cut)
Behind the Rhine (low cut)
Brian Hazard is a recording artist with fifteen years of experience promoting his seven Color Theory albums. His Passive Promotion blog emphasizes “set it and forget it” methods of music promotion. Brian is also the head mastering engineer and owner of Resonance Mastering in Huntington Beach, California.


Reader Comments (6)
What's your opinion on iZotope's Ozone software? Miracle cure or the Taco Bell of mastering shortcuts?
I confess I haven't messed with it in years. I enjoyed reading the tutorial from an early version, but felt that the layout encouraged users to mess with unnecessary options, like adding reverb, which I almost never do. It takes a lot of time to construct useful A/B comparisons between EQs, limiters, and especially compressors - so I don't see myself revisiting it any time soon.
re: Mac alternatives - if Logic is your weapon of choice, the standard EQ plugin has a great built-in analyzer that I frequently refer to for individual tracks as well as the master stereo mix.
..and of course the spectrum plug in Live, though I like the Voxengo better.
@Brian: When mixing d'jass music, I assume the lead/solo instrument, in this case baritone saxophone, takes the role of the vocal. There's a lot of "information" in the lower spectrum of that horn, and putting a 150 hz shelf on it's eq often changes the timbre radically, making a beautiful rich sounding horn sound like a midi track from a casio. Outside of balance/temperment..any mastering ideas to use to be able to pull the horn through intact while still giving it space?
Just found MTT yesterday..great site.
Just found this site.....Great Reading Brian.... Thank you.
And I also downloaded the Span AU for Mac. I've been using Waves PAZ and Blue Cat for K-meter. If I'd only known.
Thanks again and all the best.
Cool...